• Home
  • About
    • Meet Kaitlin!
    • Disclosures
    • Mediavine Privacy Policy
    • Subscribe
    • Contact
      • Guest Post Guidelines
  • Advertise
    • Media Kit
  • Resources
    • The Simply Organized Home YOUTUBE CHANNEL
    • Favorite Children’s Books
    • My Home Management Toolbox
    • Start a Blog
    • Blogging Resources
  • Shop
    • {NEW} 2023 Budget Binder
    • {NEW} 2023 Digital Budget Template
    • {NEW} 2023 Simply Organized Home Binder
    • {NEW} 2023 Simply Organized Planner
    • Meal Planning + Recipe Organization Kit
    • Filing System Guide
    • Email
    • Facebook
    • Instagram
    • Pinterest
    • YouTube

The Simply Organized Home

  • Blog
  • Organize
    • Living Room
    • Kitchen & Dining
    • Entryway
    • Master Bedroom
    • Kids Room
    • Bathroom
    • Laundry Room
    • Office
    • Finances
    • Toys
    • Time Management for Moms
  • Declutter
    • Simplify Your Home
    • Simplify Your Routines
    • Simplify Your Schedule
    • Simplify Your Finances
  • Home Management
    • Cleaning
    • Binders
    • Printables
    • Tips & Tricks
  • Home Decor
    • Budget Decor
    • DIY
    • Farmhouse Style

in Budget Decor· DIY· Farmhouse Style· Home Decor

How to Make a DIY Rustic Wood Sign

If you walked in my home right now, you would find my walls decorated with words I find inspiring, Bible verses, and quotes. I really like the farmhouse-style decor so I found a way to make simple, rustic wood signs without breaking the bank!

Are you looking to add some character to your home on a serious budget? These DIY Rustic Wood Signs are super easy and very affordable to make! Pop over to get the tutorial!

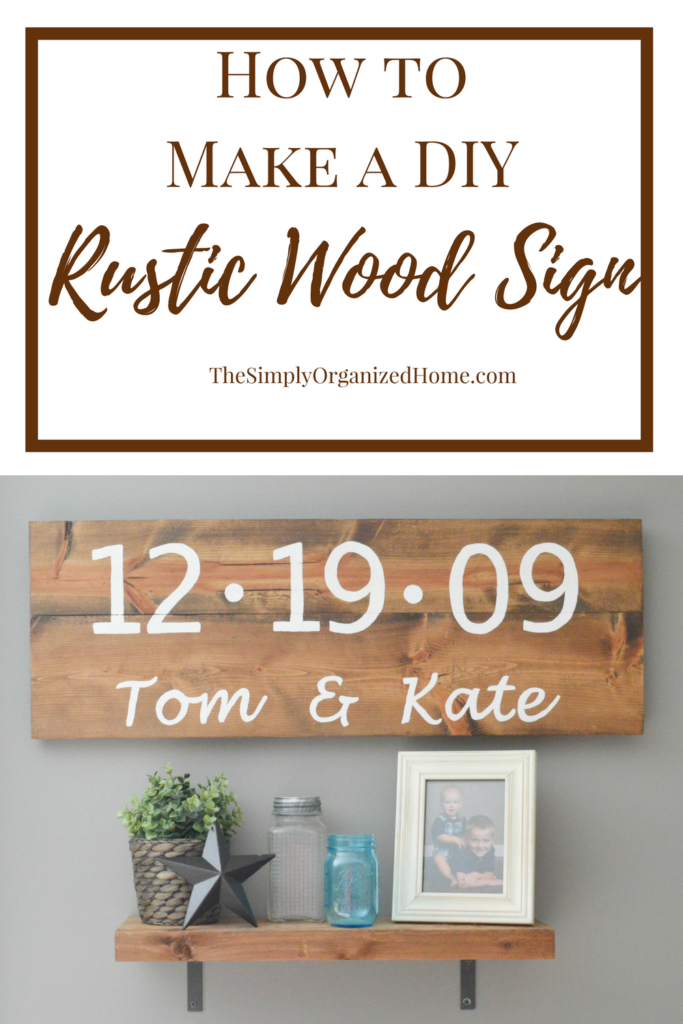
I found a few pictures of signs I wanted to replicate from Pinterest. When I clicked through these pictures I was brought to Etsy stores where these signs cost anywhere from $75-$150! Well, I don’t know about you, but that’s definitely not in my budget!

So I set out on a mission to figure out how to do it on my own. After reading through a few tutorials, most people recommended having a silhouette machine cut out the graphics and then mod podge them on. Well, I don’t own a silhouette machine and I certainly didn’t want to spend the several hundred dollars to invest in one. So back to the drawing board I went!

After doing some research, I stumbled upon the ball-point pen method from That’s My Letter. It was just what I was looking for: simple and budget-friendly!

If you are looking to add a little character and charm to your home, follow the tutorial below to make your own rustic wood signs!

This post contains affiliate links for your convenience. Click here to read my full disclosure policy.

How to Make a DIY Rustic Wooden Sign
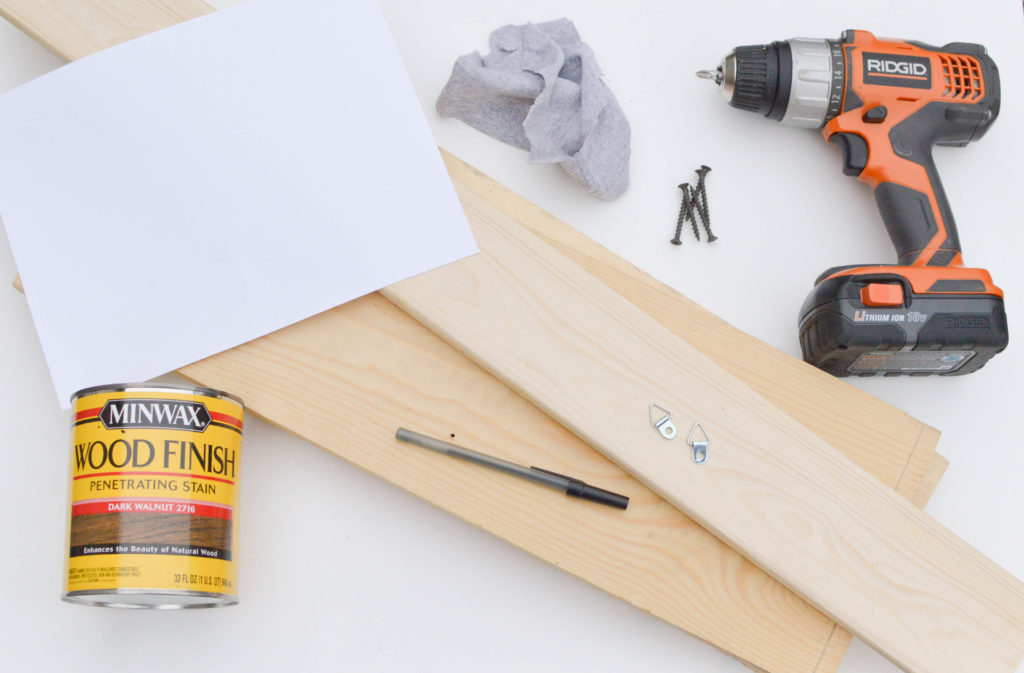
Materials:

  • Scrap 1x wood boards
    • I used 1x8s for this project.
  • 1×3 for backer board
  • Screws (Make sure they go through both boards without going all the way through. We used 1 1/4″ screws.)
  • Drill
  • Orbital sander or 180 grit sandpaper
  • Scrap t-shirt fabric
  • Wood stain
  • Disposable gloves
  • Printer
  • Printer Paper
  • Ballpoint Pen
  • Acrylic Paint
  • Fine Tip Paintbrush
  • D ring hooks
  • A Netflix Show to Binge Watch for a couple hours! 🙂
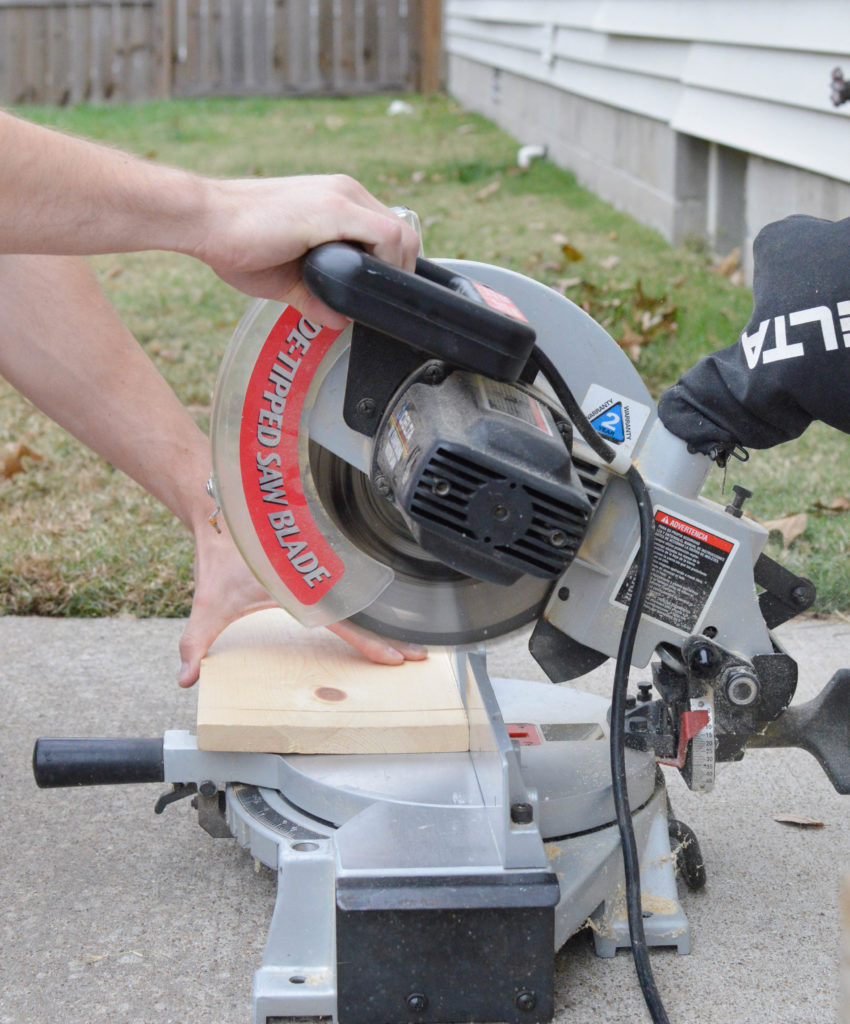
Are you looking to add some character to your home on a serious budget? These DIY Rustic Wood Signs are super easy and very affordable to make! Pop over to get the tutorial!

#1 Prep the boards.

Begin by cutting your boards to the same length. You could also make them different lengths if you are using multiple boards and want a more rustic look.
Are you looking to add some character to your home on a serious budget? These DIY Rustic Wood Signs are super easy and very affordable to make! Pop over to get the tutorial!

Mark the 1×3 boards to the correct length on the back of the sign. You will want to make sure these are the same length so that it’s easier to put on the hangers later.
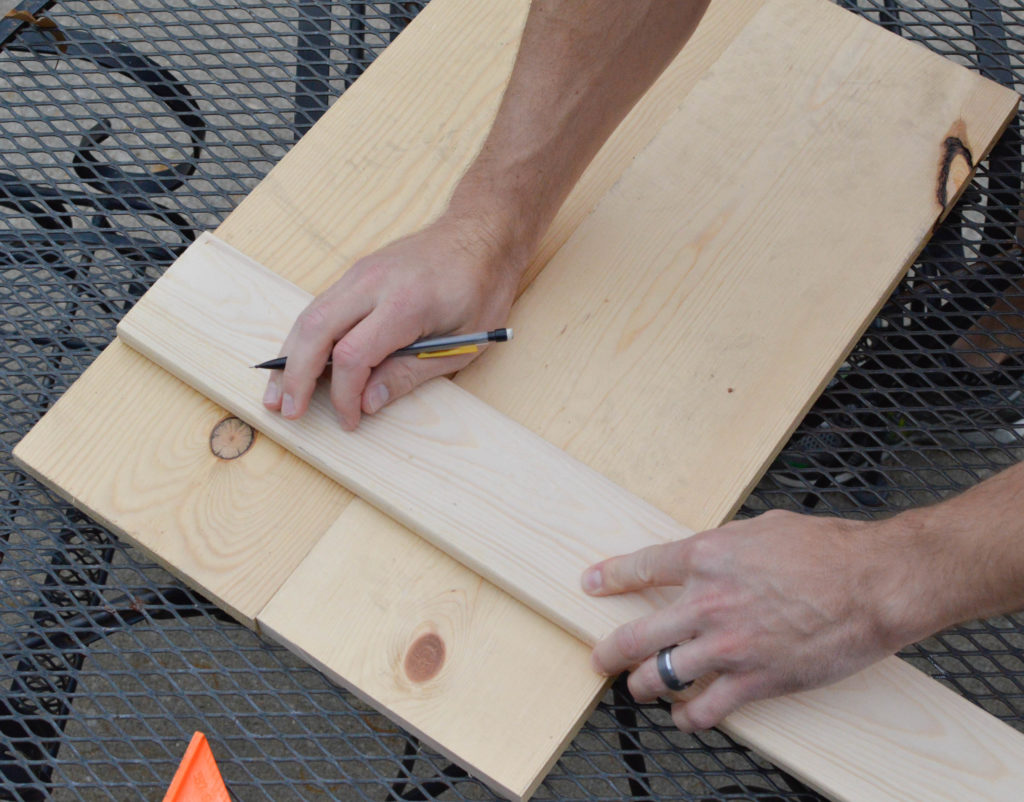
Are you looking to add some character to your home on a serious budget? These DIY Rustic Wood Signs are super easy and very affordable to make! Pop over to get the tutorial!

#2 Create the Sign.

Measure where you want to put your to put your 1×3 boards on the back of the sign.

Are you looking to add some character to your home on a serious budget? These DIY Rustic Wood Signs are super easy and very affordable to make! Pop over to get the tutorial!

Make sure the center of the boards are 16″ apart so that you are able to hang your sign in wall studs once it’s finished. These signs can be heavy depending on how big you make them!

Are you looking to add some character to your home on a serious budget? These DIY Rustic Wood Signs are super easy and very affordable to make! Pop over to get the tutorial!

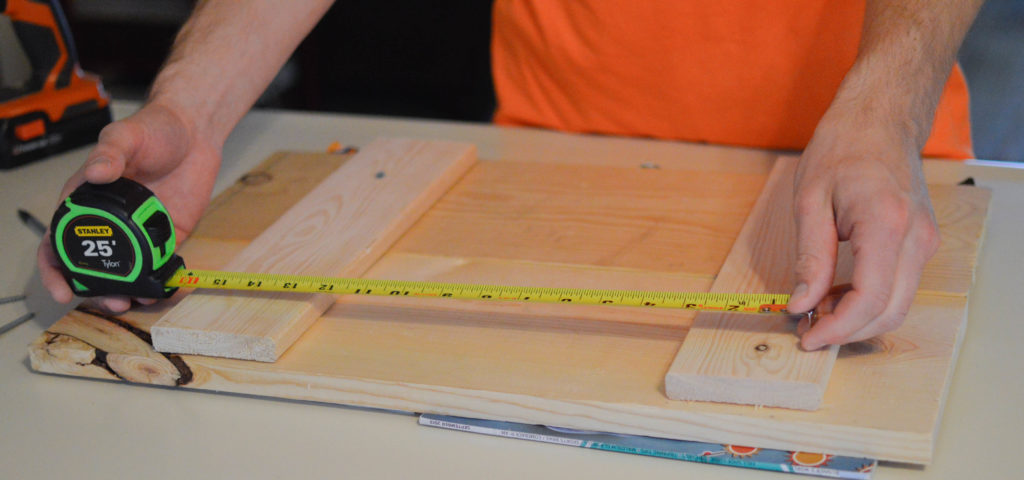
Use 1 1/4″ screws to secure the 1×3 boards to the sign. We used about 3-4 screws in each board. If it feels a little wiggly still, add another screw. (I know such technical terms around here!)
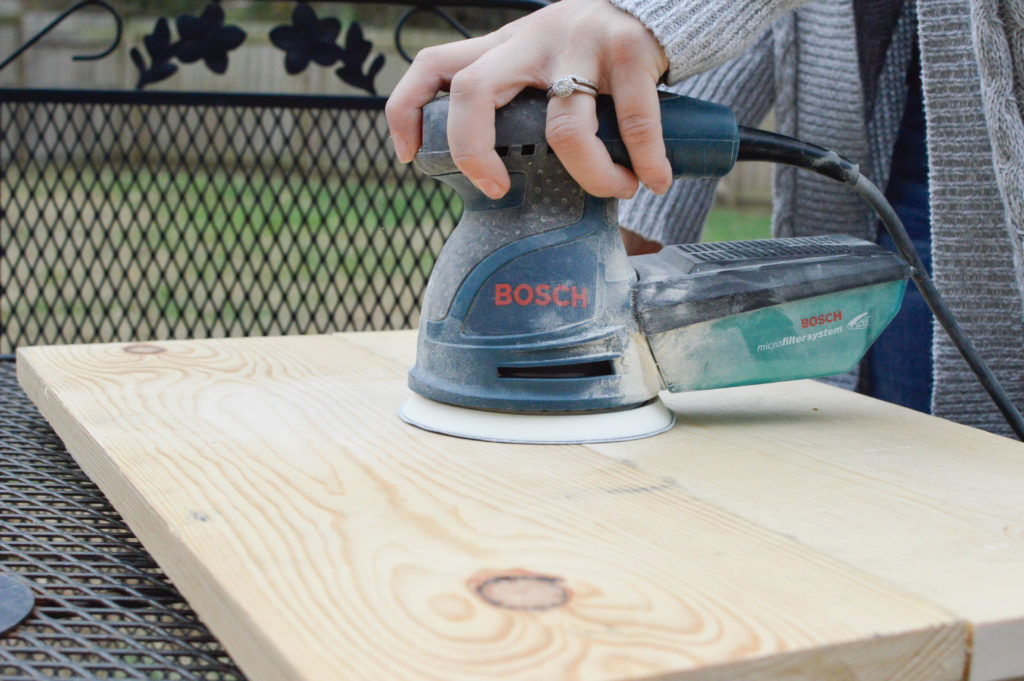
#3 Sand.

Use an orbital sander or 180 grit sand paper to create a smooth surface on the front and all 4 edges. It is personal preference how smooth you want it. If you are going for super rustic, you want actually want to beat it up before you sand it to give it some dings and dents.
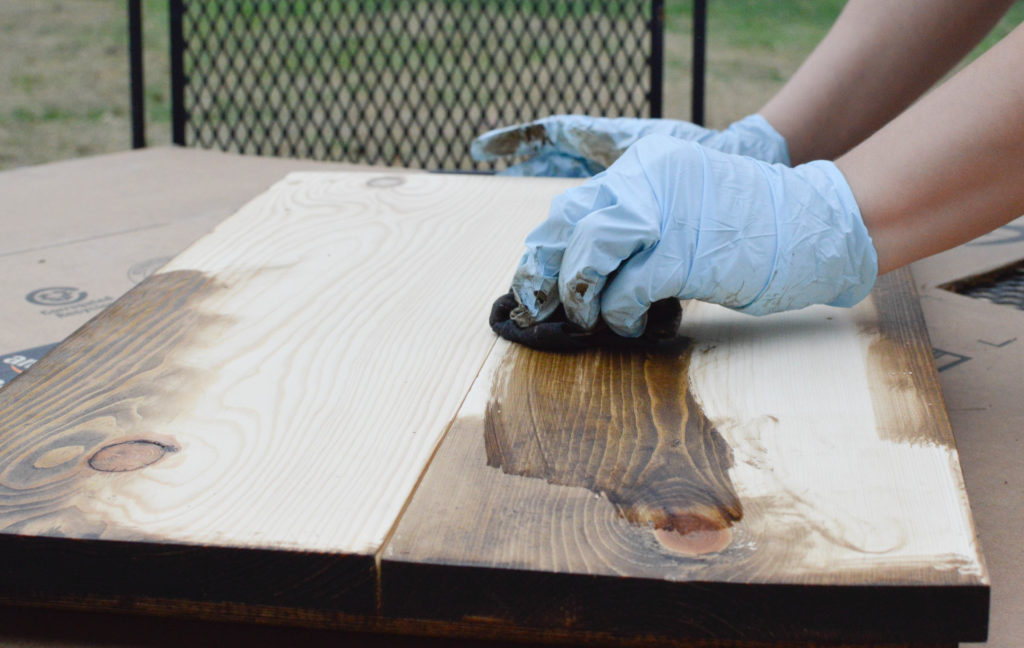
Are you looking to add some character to your home on a serious budget? These DIY Rustic Wood Signs are super easy and very affordable to make! Pop over to get the tutorial!

#4 Stain.

I used Minwax Dark Walnut to stain my sign. You will want to stain part of the back of the sign as well because it will be shown from the sides. I try to make sure that I get down in the little crease between the boards as well as around all of the edges really well.

If in doubt, add a little more stain. There is nothing more annoying than getting your sign completely done in hung on the wall only to realize you can see parts of the unstained back! Trust me. I know this from experience!

Are you looking to add some character to your home on a serious budget? These DIY Rustic Wood Signs are super easy and very affordable to make! Pop over to get the tutorial!

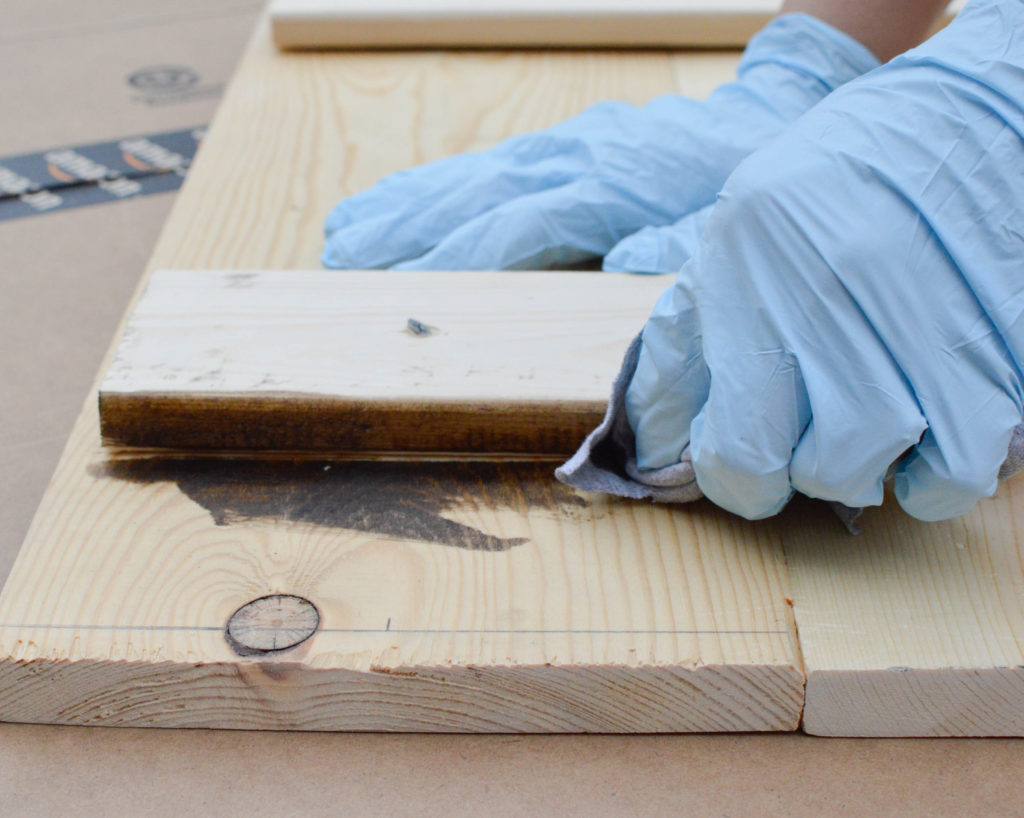
Once that dries for a short time, flip it over and stain the front and sides. Work with the grain of the wood and don’t let the stain sit in one spot for too long. This will give your stain an uneven tone.

Once your finished staining, you will want to give it at least 24 hours to dry completely before you start the next step.

Are you looking to add some character to your home on a serious budget? These DIY Rustic Wood Signs are super easy and very affordable to make! Pop over to get the tutorial!

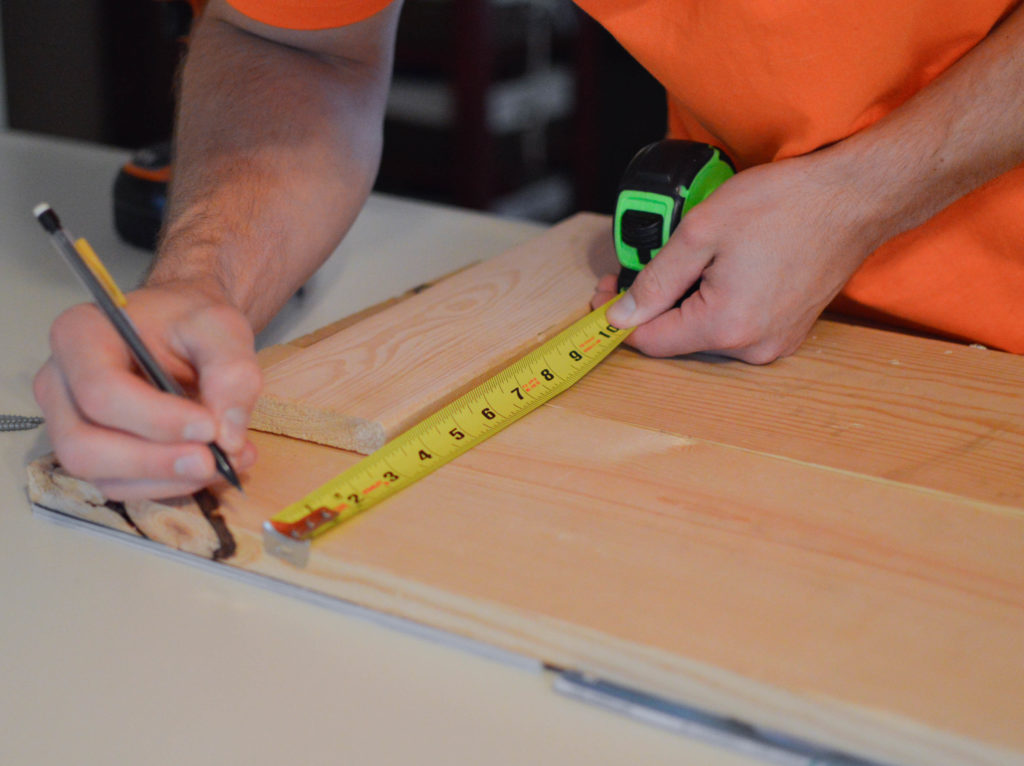
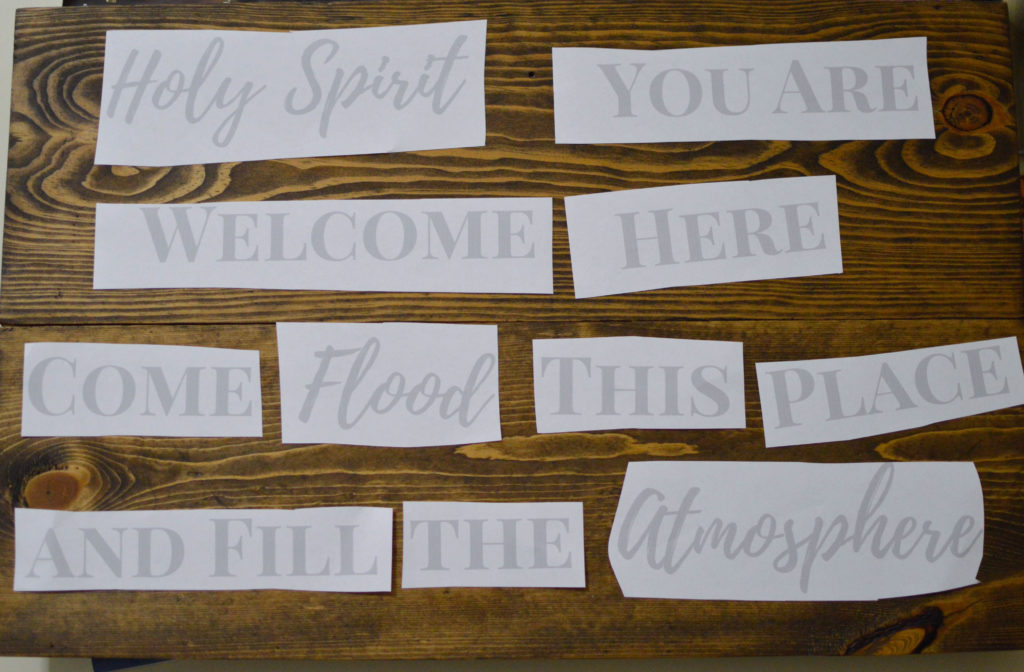
#5 Print and lay out the words on your sign.

Find a font you like and download it to your computer. For most signs, I use a combination of script and block. On this sign I used PLAYFAIR DISPLAYSC and PLAYLIST.

Print out the words you want on your sign and lay them out. Make sure they are big enough to fill the sign, but aren’t too big. This might take some trial and error.

I highly suggest printing out your letters in a soft gray or another really soft color. You will probably have to print it out a few times to get the sizing correct, plus it will make the 7th step much easier!

Are you looking to add some character to your home on a serious budget? These DIY Rustic Wood Signs are super easy and very affordable to make! Pop over to get the tutorial!

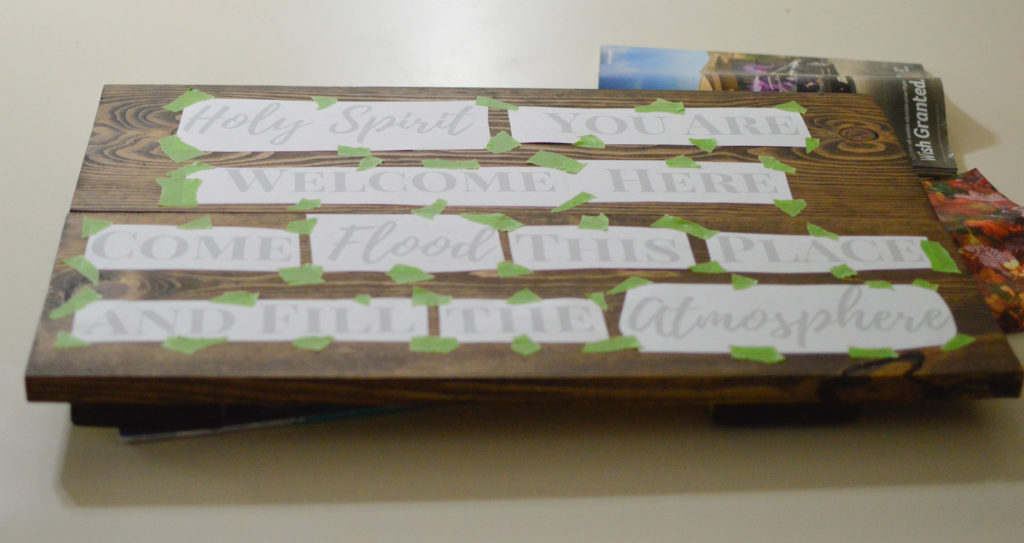
#6 Secure paper to sign.

Use a level or ruler to make sure your words are straight. Then secure the edges of the paper to the sign with painter’s tape so they won’t shift when you transfer them.

Are you looking to add some character to your home on a serious budget? These DIY Rustic Wood Signs are super easy and very affordable to make! Pop over to get the tutorial!

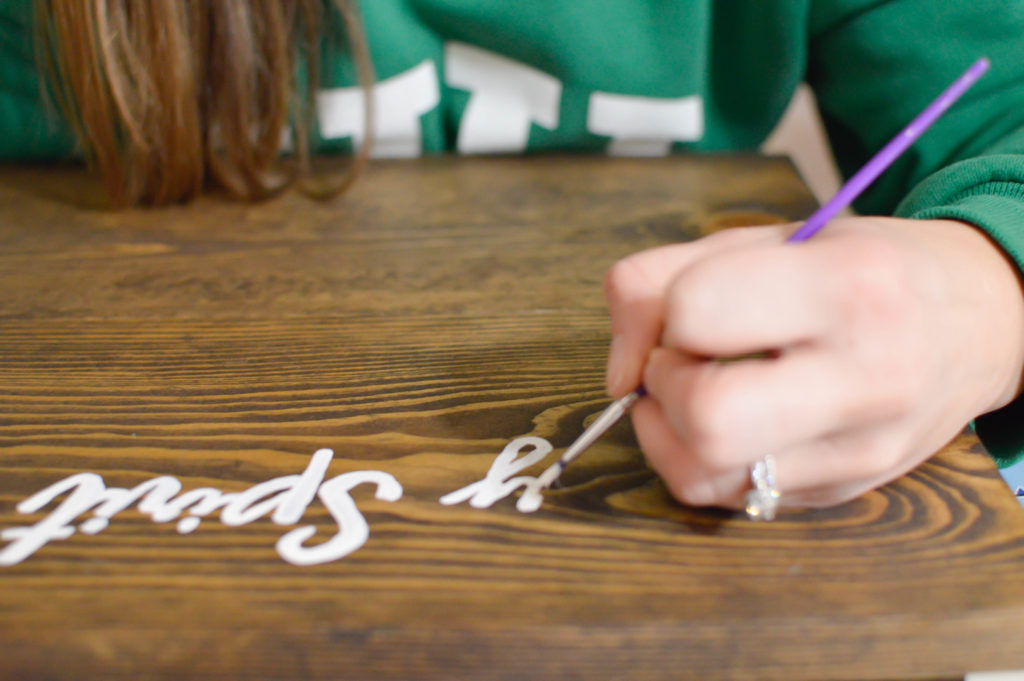
#7 Transfer words to the sign.

Using a ballpoint pen, firmly trace around each letter. You want to make a small dent or groove in the wood. This will take some time so you may want to turn on some Netflix to pass the time! 🙂

Are you looking to add some character to your home on a serious budget? These DIY Rustic Wood Signs are super easy and very affordable to make! Pop over to get the tutorial!

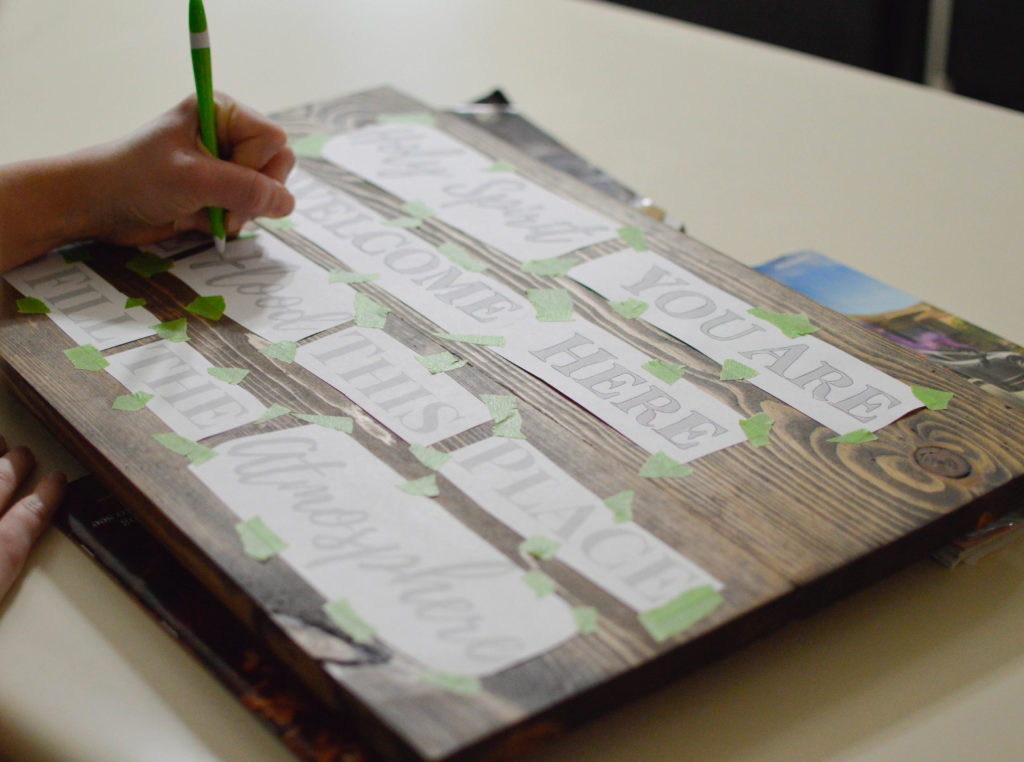
If you look closely, you can see how the word shape was transferred to the wood.

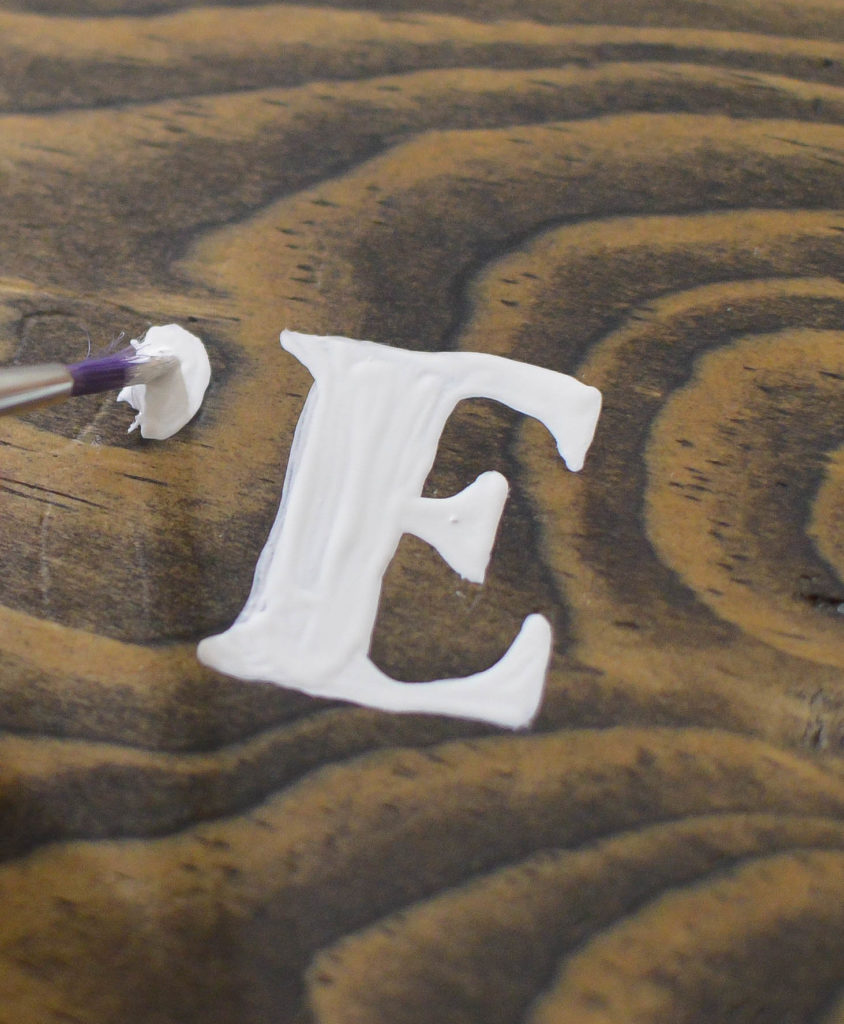
#8 Fill in the grooves with paint.

Grab your acrylic paint and a fine tip paint brush and get to work.

Are you looking to add some character to your home on a serious budget? These DIY Rustic Wood Signs are super easy and very affordable to make! Pop over to get the tutorial!

Using the grooves, brush the paint inside the letters. The paint should seep into the grooves of the letters creating a nice crisp line.

This is a little tedious, but I promise it doesn’t require a whole lot of skill. Just a steady hand and a couple hours of your time!

Are you looking to add some character to your home on a serious budget? These DIY Rustic Wood Signs are super easy and very affordable to make! Pop over to get the tutorial!

Yes, I’m a lefty so I have to work backwards so I don’t get paint all over my hand! 🙂 I put two coats of paint on the letters. The first coat usually takes about twice as long as the second. Let it dry for about 24 hours before moving onto the next step.

Are you looking to add some character to your home on a serious budget? These DIY Rustic Wood Signs are super easy and very affordable to make! Pop over to get the tutorial!

#9 Add the brackets.

You will hang your brackets on the back of the 1×3 boards. Measure down the same distance from the top of each board so the brackets will be level. Then measure 16″ apart so they will be stud-width apart. This should make a t. You should screw in your bracket directly where the two lines intersect on each board. Make sure to use a fine tip sharp pencil when marking this points.

Measure twice (or four or five times in our case!) and screw once!

Are you looking to add some character to your home on a serious budget? These DIY Rustic Wood Signs are super easy and very affordable to make! Pop over to get the tutorial!

Screw in your brackets using a drill. Then use a level to makes sure they are level and your sign will hang straight on the wall.

#10 Hang Your Sign!

Use a stud finder to mark the studs, screw in two screws using a level, then hang your sign on the wall! Your finished!

While time consuming, these signs aren’t very difficult and add a lot of rustic charm to your home. I love how personal they are and how they can be customized to each family!

Are you looking to add some character to your home on a serious budget? These DIY Rustic Wood Signs are super easy and very affordable to make! Pop over to get the tutorial!

I hope this tutorial has been helpful! I would love to see a picture of your sign if you make one! Take a pictures and send it to [email protected]!

What have you DIYed lately?

« Cleaning Tips: What to Do When You Fall Behind on Cleaning
Create an Organized Filing System »

Comments

  1. Sarah @ The Teacher's Wife says

    December 14, 2016 at 8:25 am

    I love with this! Adding it to my list of projects to knock out this year!

    • Kaitlin says

      December 14, 2016 at 10:22 am

      Thanks Sarah! I kind of went a little wood sign crazy in my house! They are in almost every room! 🙂

  2. Amy @ The Quiet Homemaker says

    December 14, 2016 at 2:10 pm

    Wonderful job! This is really cool! Can not wait to try it out for the cabin.

    Thanks for posting!

    • Kaitlin says

      December 17, 2016 at 7:39 am

      Thanks, Amy! I bet it would look amazing in your cabin!

Hi! I’m Kaitlin!

Wife, mom, blogger, cookie baker, clutter-clearer, budget writer, and simple living enthusiast. I'm so glad you're here! Read More…

Clear the Clutter Checklist!

Are you overwhelmed by the clutter in your home? Create a peaceful, simplified, & organized home with this free checklist to help you declutter your entire house!

Success! Now check your email to confirm your subscription.

There was an error submitting your subscription. Please try again.

We hate a cluttered inbox too! We promise not to send you any unhelpful emails! Powered by ConvertKit
  • Email
  • Facebook
  • Google+
  • Instagram
  • Pinterest
  • YouTube

Popular Posts

Popular Posts

Copyright

I love it when you share! Please keep in mind that all images and text on this site are property of The Simply Organized Home. Feel free to use one or two photos provided that a link back to my original post is included. Please do not remove any watermarks, crop, or edit any of my images without first obtaining written permission from me. All free printables offered are for personal use only. Pinning is always welcomed and appreciated! Thank you!

Amazon Associates Affiliate Program

The Simply Organized Home is a participant in the Amazon Services LLC affiliate program, which pays advertising fees for for linking to amazon.com. You will occasionally see a link within posts to products on Amazon for your convenience. If you make a purchase through one of these, I receive a commission at no additional cost to you. I thank you for your support and hope these links help you as you create a home you love and enjoy.

POLICIES

COMMENT POLICY: I love to hear comments from my readers. Please keep this a place of encouragement where we lift each other up, rather than tear each other down. I accept constructive criticism, but harsh and hateful comments can and will be removed. Please remember the old saying, “If you can’t say something nice, don’t say anything at all.” Be kind, give grace, and stay encouraging.

PRIVACY POLICE: See full details here.

Copyright © 2023 · Market theme by Restored 316